Connect your wallet to Hyperliquid
Trading on Hyperliquid begins with a non-custodial connection. Unlike centralized exchanges that hold your assets, Hyperliquid operates as a self-custodial platform. You retain full control of your private keys, meaning you are responsible for securing your funds. This architecture eliminates counterparty risk but demands strict adherence to security protocols.
Start by visiting the official Hyperliquid interface at app.hyperliquid.xyz. Navigate to the wallet connection menu and select a compatible Web3 wallet. MetaMask and Rabby are the most widely supported options for interacting with the Hyperliquid EVM-compatible chain. Ensure your browser extension is updated to the latest version before proceeding.
Once you select your wallet, a signature request will appear. This transaction does not cost gas from your mainnet balance; it is a lightweight signature that authorizes the platform to track your on-chain positions. After signing, your address will appear in the top-right corner, indicating a successful connection. You are now ready to bridge assets or deposit directly to begin trading perpetuals.
Fund your account using the bridge
Funding a Hyperliquid account requires moving assets from an external Layer 1 blockchain into the Hyperliquid L1. Unlike centralized exchanges where deposits are internal ledger updates, Hyperliquid operates as a non-custodial on-chain platform. This means you must actively bridge funds to your own wallet address on the Hyperliquid network. The primary asset for trading perpetuals is USDC, which is bridged from networks like Arbitrum or BNB Chain.
This process is not automatic. You must initiate the transfer through the official Hyperliquid bridge interface. The bridge acts as the gateway, locking your assets on the source chain and minting equivalent value on the Hyperliquid L1. Because this involves moving capital onto a new blockchain, verifying the network settings is critical. Sending USDC to the wrong network or address can result in permanent loss of funds.
Step 1: Connect your wallet
Navigate to the Hyperliquid app and connect your Web3 wallet (such as MetaMask or a hardware wallet). Ensure your wallet is set to the correct source chain, typically Arbitrum One for USDC. The interface will display your current balance on the source chain, confirming that your wallet is recognized and ready for interaction.
Open the Hyperliquid app and click the connect button. Select your preferred wallet provider. Verify that the network selected in your wallet matches the source chain for your bridge (e.g., Arbitrum). A successful connection displays your wallet address in the top right corner.
Locate the bridge section within the Hyperliquid interface. This is typically accessible from the main navigation or a dedicated "Bridge" tab. The bridge interface allows you to select the asset (USDC), the source chain, and the destination (Hyperliquid L1). Ensure you are using the official bridge link provided by Hyperliquid to avoid phishing sites.
Enter the amount of USDC you wish to deposit. Review the network fees and estimated arrival time. Approve the token spend in your wallet, then confirm the bridge transaction. Wait for the transaction to finalize on the Hyperliquid L1. Your balance will update automatically once the bridge confirms the transfer.
Step 2: Verify your deposit
Once the bridge transaction is complete, your USDC balance will appear in your Hyperliquid wallet. It is essential to verify that the funds have arrived in the correct account before attempting to trade. Check the "Wallet" section of the Hyperliquid interface to confirm the balance. If funds are not visible after the expected confirmation time, check the source chain explorer to ensure the transaction was successful.
Step 3: Start trading
With your account funded, you are ready to open positions on Hyperliquid perpetual markets. Navigate to the trading interface, select a market (e.g., BTC-PERP), and configure your order type. Remember that Hyperliquid trades are settled on-chain, so ensure you have enough USDC to cover both the position size and the required margin. Monitor your liquidation price closely to manage risk effectively.
Place your first perpetual trade
The interface is where theory meets execution. Hyperliquid’s trading terminal is built for speed, but speed without precision is dangerous. Before you click, understand that every order you place is settled on-chain. This is not a centralized exchange with a hidden ledger; your position, collateral, and settlement are visible and immutable. This transparency is the platform’s primary advantage, but it also means you are responsible for your own risk management.
Connect your wallet and select a market
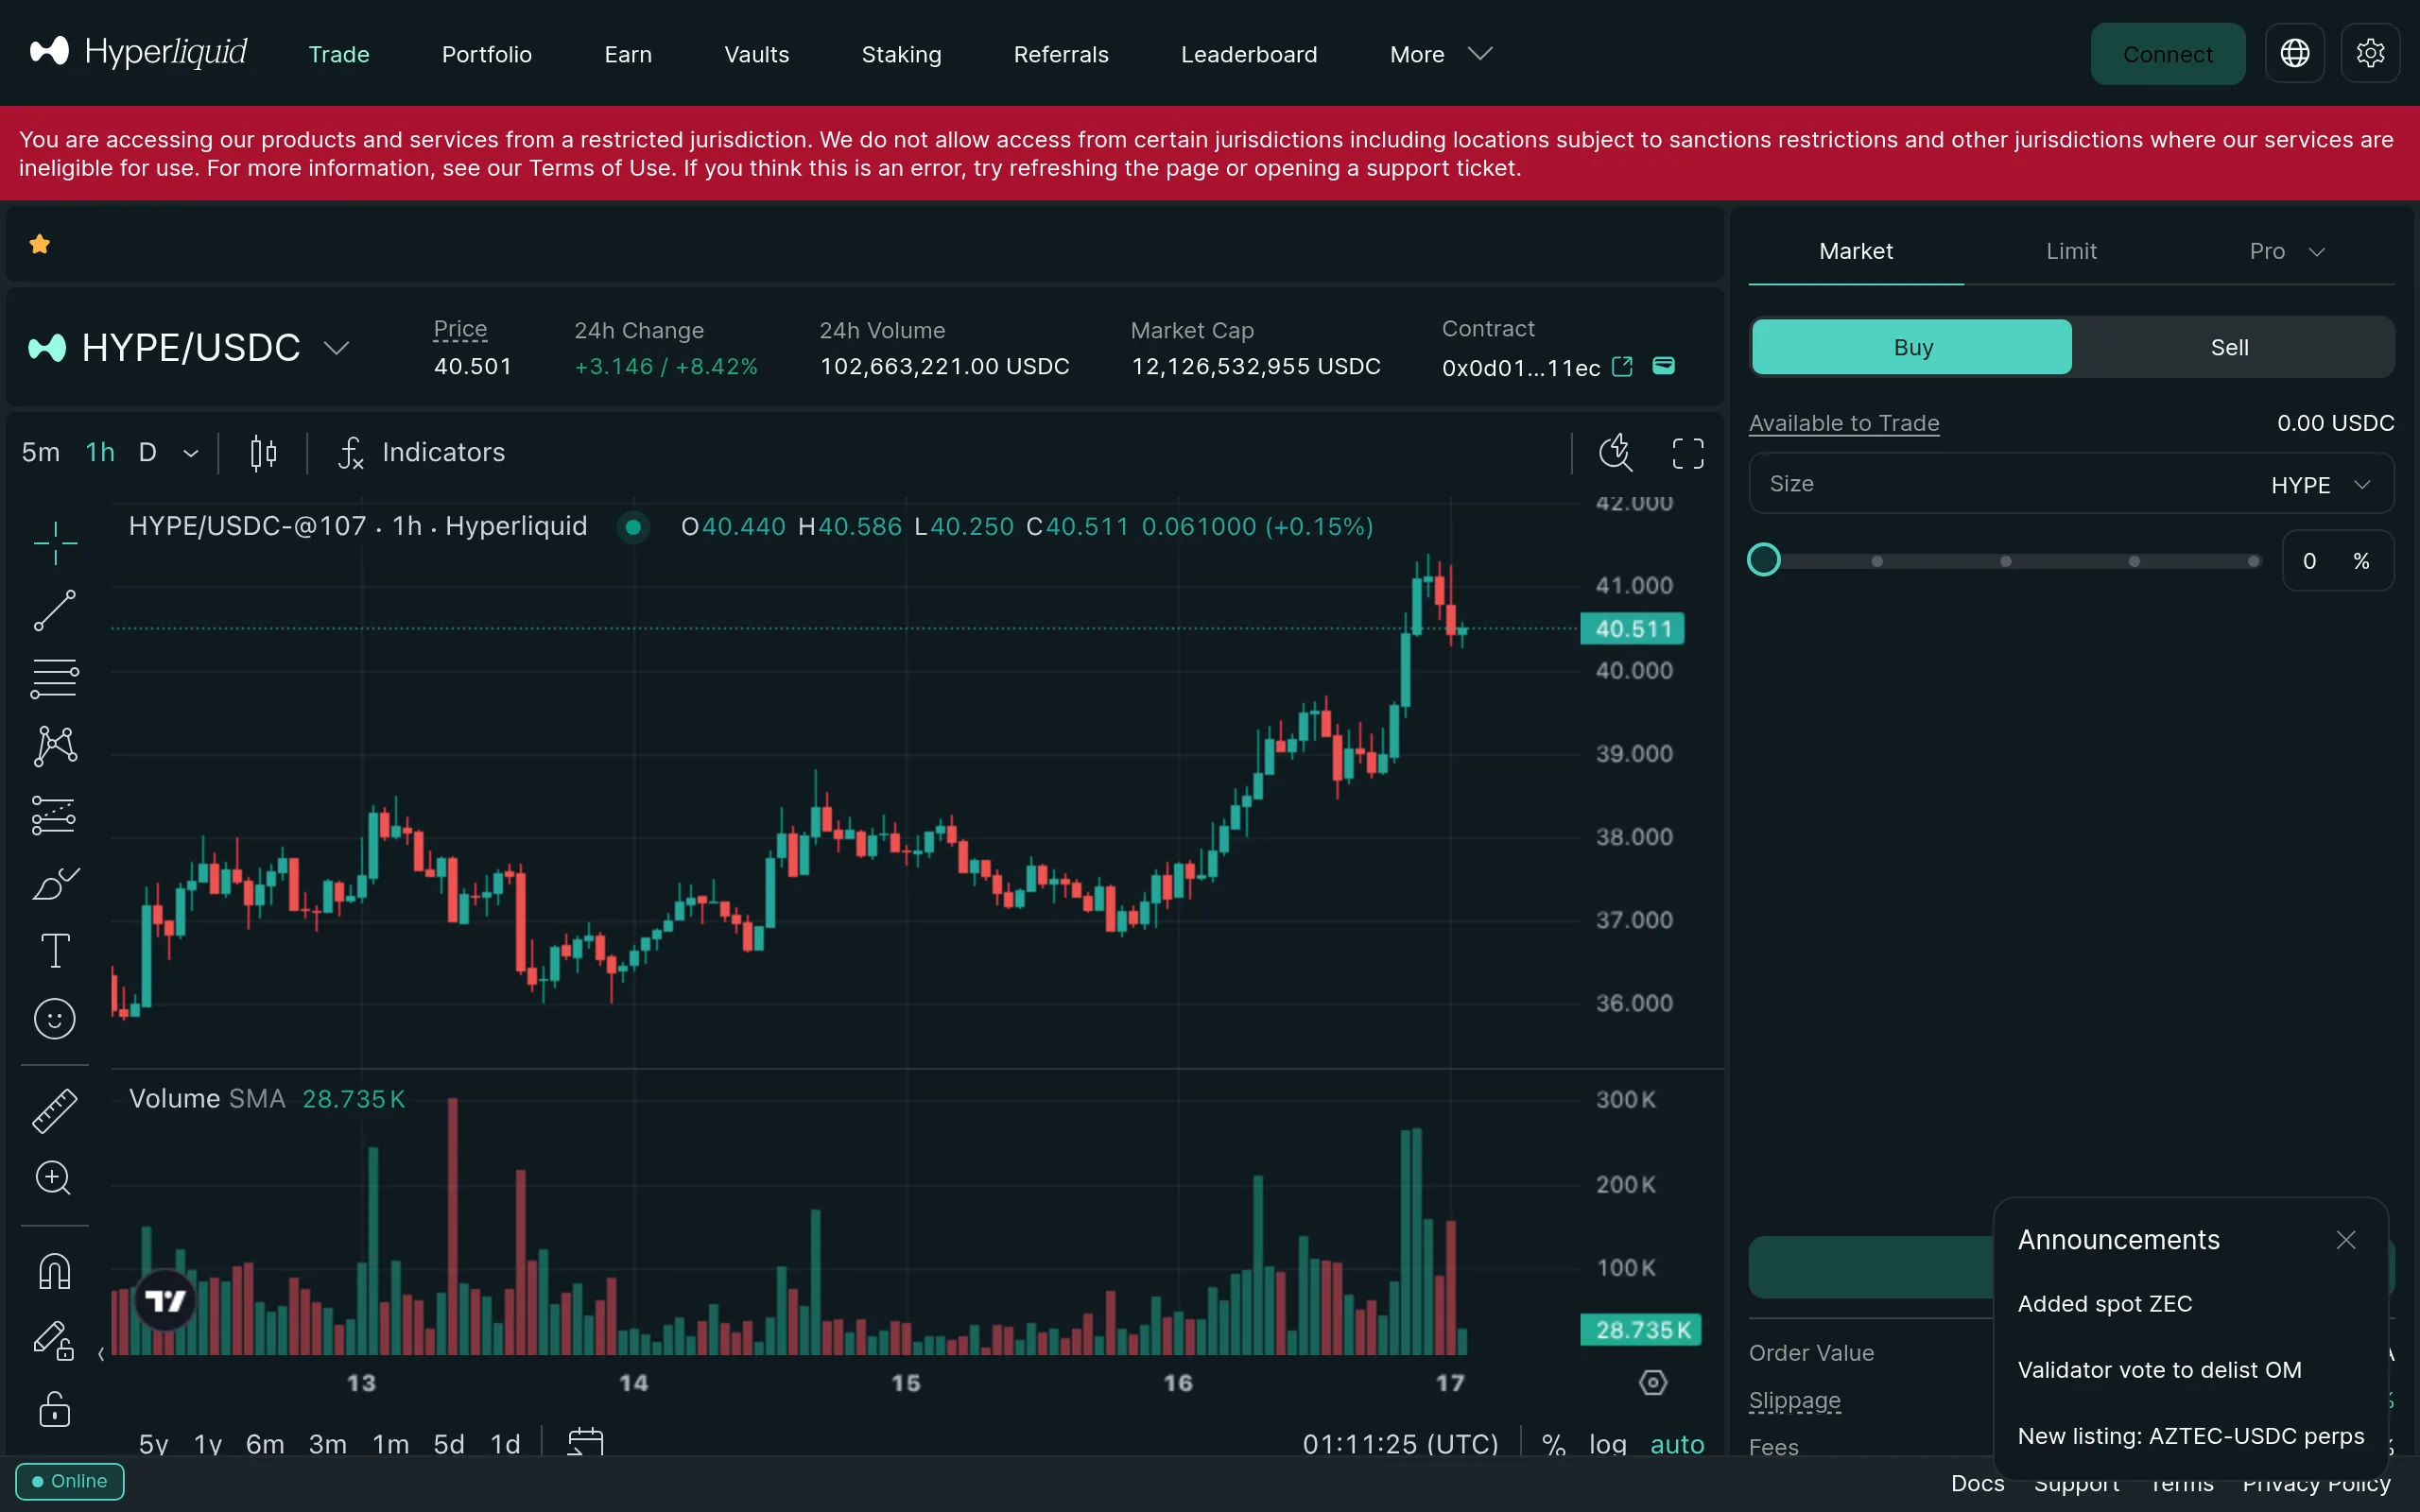
Start by connecting your Web3 wallet to the Hyperliquid app. Once connected, navigate to the "Trade" tab. The interface displays a list of available perpetual markets. For this walkthrough, select BTC-PERP. This is the Bitcoin perpetual contract, the most liquid market on the platform. Notice the real-time price feed in the top left. This data is sourced directly from the Hyperliquid chain, ensuring you are trading against a transparent price oracle rather than a potentially manipulated central order book.
Set your leverage and order type
Hyperliquid allows up to 50x leverage, but high leverage amplifies both gains and liquidation risk. For your first trade, stick to 2x-5x leverage. Locate the leverage slider on the right side of the order panel and adjust it carefully. Next, choose your order type. A Limit Order lets you specify a price; the trade only executes if the market reaches that level. A Market Order executes instantly at the best available price. For a first trade, a limit order is safer as it prevents slippage and unexpected fill prices.
Execute the trade and monitor on-chain settlement
Enter your size in BTC and click Buy (for long) or Sell (for short). You will see a confirmation modal. Review the estimated liquidation price and fees before confirming. Once confirmed, the transaction is broadcast to the Hyperliquid chain. Within seconds, your position appears in the "Positions" tab. You can monitor your unrealized PnL (profit and loss) in real-time. Because the settlement is on-chain, you can verify your position on a block explorer if needed. This immediacy and transparency distinguish on-chain derivatives from traditional centralized finance.
Connect your Web3 wallet to the Hyperliquid app. Ensure you are on the correct network and have sufficient USDC for initial margin.
Navigate to the Trade tab and select BTC-PERP from the market list. Verify the price feed is active.
Adjust the leverage slider to 2x-5x for safety. Choose a Limit order to control your entry price, or Market order for immediate execution.
Enter your size, review the liquidation price, and confirm the transaction. Monitor your position in the "Positions" tab as it settles on-chain.
Note: Hyperliquid is non-custodial. You retain control of your funds at all times. Never share your private key or seed phrase with anyone, including support staff.
Understand HLP and its returns
Hyperliquid Profit (HLP) is the platform’s native liquidity pool, designed to capture value from trading activity rather than traditional yield farming. When you deposit assets into HLP, you are effectively providing the liquidity that traders use to open and close perpetual positions. In return, the pool earns a share of the trading fees generated by all users on the platform.
This structure creates a direct link between your returns and the health of the trading ecosystem. Unlike staking rewards that come from token emissions, HLP returns are driven by fee volume. However, this is not a risk-free passive income stream. The pool is exposed to impermanent loss and, more critically, to the net performance of traders. If the collective trading base loses money, the HLP pool profits; if traders win consistently, the pool’s value can decline.
| Feature | HLP Liquidity Provision | Traditional Staking |
|---|---|---|
| Source of Yield | Trading fees from platform volume | Token emissions/inflation |
| Primary Risk | Trader PnL (net losses/gains) | Token price depreciation |
| Volatility | High (tied to market activity) | Moderate (tied to token supply) |
| Control | Non-custodial, on-chain | Often protocol-governed |
Because HLP’s performance is tied to the net PnL of traders, returns are variable and not guaranteed. During periods of high volatility and intense trading activity, fees may surge, boosting potential returns. Conversely, in quiet markets or if the trader base becomes consistently profitable, the pool may experience drawdowns. You are not lending capital to a borrower; you are acting as the counterparty to the market’s aggregate risk. This makes HLP a speculative instrument that requires active monitoring of platform metrics rather than a set-and-forget investment.
Check HYPE token utility and price
Before executing trades, verify the HYPE token’s current market position. The token powers the Hyperliquid ecosystem, offering governance rights and potential fee discounts for holders. Understanding its price action helps contextualize platform liquidity and trader sentiment.
Recent data indicates HYPE is trading between $63 and $66 USD, with daily volumes exceeding $500 million. This liquidity depth supports the high-frequency nature of on-chain perpetuals. Always check the live price before funding your wallet to ensure accurate capital allocation.
The token’s utility extends beyond simple speculation. Holders can stake HYPE to secure the network or use it to reduce trading fees. However, price volatility means utility value fluctuates. Treat the token as a functional component of your trading infrastructure, not just an asset to hold.
Common mistakes when starting on Hyperliquid
New traders often lose capital by misunderstanding the platform's architecture. Hyperliquid is a fully onchain, non-custodial exchange, meaning you retain control of your keys but also bear full responsibility for transaction accuracy. Unlike centralized exchanges, there is no customer support to recover funds sent to the wrong address.
The most frequent error is bridging assets to the incorrect network. Hyperliquid operates on its own L1, requiring you to use the official Hyperliquid bridge or a trusted third-party bridge to move funds from Ethereum or Solana. Sending USDC directly to the Hyperliquid contract address without using the proper bridge interface will result in permanent loss.

Ensure your wallet is connected to the correct chain before initiating any transfers. Cross-reference the supported networks in the official Hyperliquid documentation.
Access the bridge directly through the Hyperliquid interface. Avoid third-party links found in social media comments or unverified forums.
Remember that you are self-custodying your assets. Review the liquidation price and leverage settings before opening any position.
Over-leveraging is another critical pitfall. Hyperliquid offers high leverage options, which amplify both gains and losses. A small market movement against a highly leveraged position can trigger immediate liquidation. Always calculate your liquidation price before entering a trade and set appropriate stop-loss orders if available.
-
Verify you are using the official Hyperliquid bridge
-
Confirm the destination network matches your asset
-
Check leverage settings and liquidation price
-
Ensure sufficient gas fees for transaction execution
Avoid relying on informal advice from social media influencers. The onchain nature of Hyperliquid means all transactions are public and irreversible. Double-check every transaction detail against official sources before signing.
No comments yet. Be the first to share your thoughts!